 copyright 1998, 1999 by Steve Jackson
Version of March 28, 1999
Parte ye First . . . Combat!
This game can be a great deal of fun even if you do nothing more than choose up sides and sail around sinking each other.
NEEDED FOR PLAY
- Huge quantities of ships and pirate figures. The more you have, the more players you can entertain.
- Several copies of these rules.
- Lots of ship record sheets . . . one for every ship. Clipboards are useful. I plan to stencil mine with a skull & crossbones pattern, when I get around to it.
- Enough player setup sheets for all.
- A goodly supply of pencils with erasers.
- Grease pencils, to mark special figures in an erasable way.
- Long tape measures and short rulers, for movement and combat.
- 6-sided dice . . . at least 3. More is better. Big ones are fun.
- Cotton, to mark destroyed cannon without pulling them off.
- Players. As many as you can outfit with ships and crews. The more experienced your referees (or players) the more you can handle at once.
- At least one referee for every ten players, unless the players are experienced.
- A supply of costume stuff: red and blue bandannas, eye patches, etc.
- A large playing area; the more players you have, the more space you need.
- Atmosphere! Pirate flags, pirate music, pirate costumes . . . rum, saucy wenches . . . a chest of gold . . . a ship's bell to chime the hours . . . a parrot . . . barbecue (very period!) . . . Let nothing hold ye back, me buckos!
SETUP
Playing Area
A large space of floor, at least 20 feet each way. Bigger is better.
A few tables will be needed for the GMs, and to hold spare ships and so on. Lots of chairs should be provided so the players will have a place to sit between moves.
Since this is a very visual game, it's a good idea to set it up where non-players can admire the ships . . . as long as they can't walk THROUGH the battle area!
Assigning Ships
Each player gets control of a ship, or a fleet of ships, or a shore base. (Control of a shore base can be boring unless the player also has ships, or has something to draw the other players to him, either for trade or combat.)
Division of the available ships is up to the referee. I usually divide the ships into not-completely equal groups, and let the best-costumed or otherwise most-deserving players (like those who helped with setup!) choose first.
Everything else being equal, ship classes (see below) can probably be added up for a rough balance. That is, three Class 2s are more or less equal to a Class 6 in a stand-up fight. Overall, a single big ship is tougher, but less maneuverable, than a group of little ones. Skillful play can take either advantage and turn it into a victory.
Manning the Fleet
In a straight combat game, each ship starts with (Class x 6) sailors (e.g., 6 for a Class 1, 12 for a Class 2, and so on). If you have fewer pirates, you will have to be less generous. Pirate ships were historically very heavily manned. NPC merchant ships encountered as prey will have smaller crews: (Class x 2) sailors, plus 2.
Players can get extra crewmen by rescuing marooned figures from islands (giving them a reason to sail around). When no ships are near an island, the referee can put another pirate or two there, to lure someone back.
Pirates in the water (because they fell in, or because their ship sank) can be rescued, and will join the rescuer's crew. Exception: rescued pirate captains and other "special" figures will not join the rescuer's crew. They remain under the control of their original owner.
Players can also earn extra pirates for good roleplaying, good ship names, or running to get the referee a drink. This be thirsty work, arrrrrrrr!
Below: Admiral Derek Schin of the Royal Navy plans a gallant defense against the pirate horde . . .

The Captain
One of each player's starting figures is his Captain, his personal character. No player may have more than one Captain. Captains are indicated in one or more of four ways: they have a plume in their hat, they wear epaulets, they wear a cape, or they are Wenches (that is, female figures). Ideally, only Captains would have the "pirate captain" style hats, but such a hat would never be REQUIRED for a Captain.
The Captain has the following abilities:
- Captains are immune to cannon fire unless the rest of the crew is gone.
- Captains are immune to musket or pistol fire unless the rest of the crew is gone OR the musket or pistol is being fired by another Captain within 3 inches.
- There is a -2 penalty to hit a Captain with any hand weapon (e.g., cutlass).
- Captains get +1 to hit with any weapon, including cannon.
- In the campaign game, the Captain knows how to navigate. Other pirates can try to navigate, but may get lost.
Starting Positions
Every game is different. I usually scatter several islands around; some are just obstacles, some have treasure chests to pick up and/or marooned sailors to rescue. Special islands, which can give rise to whole scenarios, include Jungle Island (with crocodiles and natives) and Skull Island (gray and rocky, with evil skeletons). There are others.
Flag Island is a small island bearing the huge mast which shows the wind direction (see Wind, below). It should be fairly central, and can hold a marooned sailor. Players are not allowed to knock down the mast . . .
I usually let the players group themselves into fleets; give each fleet a handful of pennants (red for one fleet, yellow for another, and so on) with which to identify their ships; position the fleets more or less evenly around the edge of the playing area . . . and tell them to start!
Scenarios
Part II of the rules adds more economics, character differentiation, Non-Pirate Characters (British, Spanish, Ruritanians, merchantmen, fishermen, skeletons . . .) and roleplaying. Using these combat rules by themselves, the scenario is "Sail around, grab treasure, yell Arrrrrr!, trash the other guys' ships and have fun." On the rare occasions when players are concerned with score at the end of the game, I calculate as follows:
For enemies sunk: Class x 10.
For ships captured: Class x 20.
For treasure gained: The value shown on the coins or whatever. (I randomly put a few coins or other treasure markers into treasure chests and place them on the islands. Recovered treasure must be left on ships, not pocketed by the player; whoever has it at the end of the game gets to score it.)
Amazing roleplaying is paid off instantly when it happens, by the appearance of new recruits on board the deserving player's ship, and does not score points. However, I think it would be justifiable to give a separate award for the best roleplaying!

SHIP CLASSES
Ships and boats are divided into CLASSES, based on size:
- 0 - Boat (a canoe, rowboat or sailboat, or longboat)
- 1 - Cutter (which, in my own fleet, includes a lot of different little ships that are not really "cutters," from miniature square-riggers to sloops). A cutter is a small custom-built hull. A more precise definition may be needed.
- 2 - Brig, or regular ship with no center sections. A brig is a larger custom-
built hull. Again, a more precise definition is needed. Or maybe not.
- 3 - Regular ship with 1 center section, or wide ship with no center sections.
- 4 - Regular ship with 2 center sections, or wide ship with 1 center section.
- 5 - Regular ship with 3 center sections. Center sections being hard to come by, these "schooners" are rare.
- 6 - Wide ship with 2 center sections.
- 7 - Wide ship with 3 center sections.
- 8 - Wide ship with 4 center sections.
A ship's class determines:
- (1) How many guns it can carry. The number is equal to its class.
- (2) How many hull hits it can take: 10 times its class, with a minimum of 1.
- (3) How many rigging hits it can take: 5 times its class, with a minimum of 1.
- (4) whether there is a bonus or penalty to hit it with cannon fire.
A ship's class affects what crew it starts with in a straight combat scenario, but NOT how many crew it can actually carry. That is limited only by how many figures you can acquire and pile on to it! But note: any figure that falls overboard is at the mercy of the sharks.
Record Sheets
Each ship has a record sheet. There is a separate record sheet for each type of ship, showing its hit points, movement, maximum cannon and so on. The player should use this to mark off his hits when the ship takes damage, and erase them when damage control does its job.
Boats don't need record sheets; one rigging hit takes all their rigging, and one hull hit sinks them. The Islander Catamaran needs to be a special case; it could reasonably survive one hull hit, maybe two, but not three.
TURN PHASING
Each turn contains the following phases:
- (1) The GM shouts out the turn number. Determine and announce wind speed and direction.
- (2) Players plot their movement and then move their ships. Movement is considered simultaneous, unless some ships "have the initiative." Remove any ships sunk by ramming.
- (3) Cannon combat. Remove any ships sunk by cannon fire, and resolve the question of whether any crew survived. Pirates killed by cannon fire fall into the sea.
- (4) Individual movement.
- (5) Individual combat. Muskets first, then pistols, then other weapons. A hit is a kill; all dead pirates fall into the sea.
- (6) All other individual actions, except damage control, take place.
- (7) Damage control. After damage control, assess new hull damage caused by existing hull damage or by fire. Remove any ships sunk by this new hull damage.
- (8) Sharks move, stopping if they reach a pirate, living or dead.
- (9) Sharks eat. Pirates eaten by sharks are removed from play.

SHIP MOVEMENT
Each ship moves once per turn, as plotted by her captain. Exception: Ships which have been abandoned, or whose movement is reduced to 0 by rigging loss, or whose crews are doing something other than work the ship, will be moved by the referee. It takes crew actions equal to a ship's Class to work her . . . if you are short by even one man, the referee will move your ship and you might as well use the extra men for something else.
Determining Initiative
Paradoxically, "initiative" in this system means moving LAST, the better to counter your foes' movements. There are three levels of initiative:
(3) Cutters whose captains are Expert.
(2) All other cutters, all other vessels whose captains are Expert, and all canoes.
(1) All other vessels.
After movement is plotted (see below) then all level-1 initiative ships are moved according to their plots, at the same time.
Then all level-2 initiative ships, if any, are moved HALF their plotted movement. They may then change the other half of their movement, if they like, as long as they have enough crew actions for any course changes required by the new movement. If there are more than one level-2 initiative ships, they must plot the changed movement and reveal it at the same time.
Then all level-3 initiative ships may move. They are an exception to the plotting rules . . . they don't have to plot movement at all, unless more than one ship is at level 3. In that case, all level 3 ships plot their movement after the level 1 and 2 ships have moved, and reveal their plots at the same time.
Plotting Movement
Each turn, each captain writes out his orders . . . that is, the way he wants his ship to move. His ship WILL move that way unless there is a collision, or he unexpectedly runs aground, or the wind changes very suddenly.
Movement orders consist of a DIRECTION and a DISTANCE, possibly with one or more changes of direction in between . . . Three sample orders are:
- Continue 8" straight north.
- Turn to the NE and move 12".
- Move 6", turn to the S, and move 4".
Ship movement is in straight lines. At the beginning of each turn, a captain may change his ship's direction a number of points equal to her initiative before moving her. (Ships do not have to go in exact compass-point directions, but for purposes of movement penalties, their headings are rounded to the most unfavorable adjacent point.)
A ship does not have to travel its full distance. It's easy to spill wind from the sails and slow down. This does not require any extra crew actions.
A ship may change course DURING its turn. Each course change requires two crew actions (one, for a boat or cutter) and changes the heading of the ship by one point. After any course change, a ship must move a number of inches equal to its class, or start a new turn, before making another course change. Thus, large ships are less maneuverable.
When a ship changes course, try to turn it on its center until it points to the new heading.
If a course change brings the ship to a heading which reduces its movement, the reduced movement takes effect immediately. If the course change would reduce the ship's remaining movement to 0 or less, the ship changes its heading but then ends its movement for the turn.
If a course change brings the ship to a heading which would give it MORE movement, do not recalculate. Just give it an extra 2" of movement, adjusted for wind speed.
Speed
The maximum distance that a ship may move in a turn is given by its base movement (given on its record sheet, and below) . . .
- (a) minus any penalty for wind direction relative to the ship's course
- (b) plus or minus any other bonuses or penalties (e.g., for damage)
- (c) times the multiplier for wind speed.
The base movement of a ship is based on its length, and its ratio of length to width long is faster than short, narrow is better than wide. (We assume that all ships start with the optimum sail area for their size.)
- Small Boat: 4" with sails, or 1" per man at the oars, up to a maximum of 3.
- Cutter: 12" (A cutter is any small custom hull. It's Class 1.)
- Brig: 12" (A brig is any larger custom hull. It's Class 2.)
- Ship with no center sections (regular class 2 or wide class 3): 10"
- Ship with one center section (regular class 3 or wide class 4): 12"
- Ship with two center sections (regular class 4 or wide class 6): 14"
- Ship with three or more center sections: 16"
Pursuit Speed
In a campaign scenario involving extended pursuit, every +1 in initiative makes a ship 2" "faster" than its rated speed, because it takes better advantage of brief wind changes. So with equal ships, an Expert captain will catch a regular one, or escape if he is being pursued. With equal captains, a cutter could catch a ship with one center section (both nominally a 12" move), though it would be a slow chase.
These bonuses don't apply to regular long-distance travel between ports. However, the bonus for an expert Helmsman DOES apply to long-distance travel.
Uncontrolled Movement
A ship may be uncontrolled for several reasons: she has insufficient crew to work her, her crew is otherwise occupied, her rigging is down to 0, or her steering has been hit. When a ship is uncontrolled, her course changes auto-matically by one point every turn, toward the wind. Her speed is half the maximum she would normally make at her current heading heading. If she has sails and enough crew, they can reduce her speed below that if they want to.
Wind Direction
Ships sail at their top speed only with a favorable wind. This is a complex subject, different for different kinds of ships, and VERY simplified for the game. Ships cannot sail straight into the wind.
The compass has 8 "points" - N, NE, E, SE, S, SW, W, NW. The flag on Flag Island shows which way the wind is blowing. The wind may change from turn to turn; this is up to the referee.
Each ship record sheet has a compass which shows its points of sailing. That is all the reference you need, but an explanation follows:
A square-rigged ship sails its full speed only ahead of the wind, or one point from the wind. For game purposes, anything but a cutter or brig is considered square-rigged. Thus, if a ship's course is to the south, it makes full speed only if the wind is from the N, NE or NW.
For the first "point" past that, subtract 2" from the ship's movement.
For the second "point" past that, subtract a total of 6" from its movement.
The next "point" would be directly into the wind. No ship can sail straight into the wind.
Cutters and brigs have different sail arrangements which let them get closer to the wind. The advantage of a cutter is that it can make good speed even very close to the wind. The advantage of a brig is that it can make its full speed at every point from straight downwind to "broad" (that is, at right angles), though it can't come as close to the wind as a cutter. See the compass on their record sheets.
A sailboat can go 4" in any direction except straight into the wind.
Determining Wind Direction
Wind direction is shown by the flag(s) atop the huge mast on Flag Island.
Wind speed is also shown by the flags. No flags = Calm; no wind. One little flag = light wind. One big flag = fair (normal) wind. Two big flags = strong wind. Three big flags = hurricane! Hurricanes only occur by magic or the referee's fiat.
The wind starts off blowing north. It may change. The GM prepares, before the game, a turn-by-turn list of what the wind is doing. It is possible to determine this either by fiat or by rolling dice. Here's a formula that was used for determining wind behavior by die roll, before I found how much easier it was to set it in advance:
Every 3 turns, or whenever he feels like it, the GM rolls one die. On a 4 the wind changes direction; on a 5 it changes speed (maybe); on a 6 it changes both. Roll 1 die to determine the change.
For direction changes:
- 1 = 2 points clockwise
- 2, 3 = 1 point clockwise
- 4, 5 = 1 point counterclockwise
- 6 = 2 points counterclockwise
Speed changes depend on current wind speed:
- Light: 1-2, no change. 3 = Calm (no wind). 4-5 = Fair. 6 = Strong.
- Fair: 1-3, no change. 4-5 = Light. 6 = Strong.
- Strong: 1-3, no change. 4-5 = Fair. 6 = Light.
When the wind dies, roll EVERY turn to see if it comes back. It returns on a roll of 4-6, always at Light speed. Roll one die.
- 1-3 = The wind reappears in the same direction it came from before.
- 4-6 = The wind reappears from the opposite direction.
Bonuses and Penalties to Movement
The commonest penalty is for rigging damage - that is, damage to sails and masts. See DAMAGE, below.
Ships may get bonuses and penalties for especially clean or dirty hulls, or for especially good or bad captains.
Wind Speed
Ship speeds above are for a normal wind. A light wind halves all maximum movements. A strong wind doubles movement. A hurricane triples it, and has other effects which the players should hope they never find out.
If there is no wind, ships don't move, except for boats propelled by oars. Each man at the oars gives a movement of 1. Oar movement is not affected by bonuses, penalties or wind.
Stopping
At any time during its move, a ship may use two crew actions to throw out an anchor from either end of the ship. This stops the ship where it is. On the movement phase of its next turn, it is blown by the wind so that the anchored end points directly into the wind. (If anchors are thrown from both ends, the ship stops dead and does not change its facing.)
Raising anchor takes four crew actions and an entire turn.
Ramming
When two ships come together, they stay together for that turn. Exceptions:
(1) If one ship is more than 4 classes larger than the other, the larger ship loses 2" of its total movement and continues forward (it cannot make any further turns) while the smaller one is simply carried along with it unless the collision sinks it by hull damage;
(2) If they were on converging courses, they move together at a course midway between their original courses, for the remaining distance of the ship that had the least movement left;
(3) The GM can arbitrarily assign his own concept of reality to any collision.
After colliding, ships may be sailed apart. Crewmen may tie them together to prevent this.
Ramming Damage
When ships come into side-to-side contact without prows touching, no damage is done.
When one ship rams nose-on into another, it does hull hits equal to its Class, halved in light wind and doubled in strong wind. (Refinement of rules needed here; allow ships to have rams? It's not period.) If it is ramming a ship of equal or greater size, it takes the same amount of damage. If it is ramming a smaller ship, it takes damage equal to its target's Class.
This assumes a ram at right angles. If the ram is at a steep angle (under 45 degrees), halve the above damage.
Tying Ships Together
Crew may tie ships together. This counts as an action. Every crew action spent this way makes one line fast between the ships. Record the number of lines tied.
Crew may also cut or untie lines, to separate ships. Each crew action has a chance of removing one line (it's not automatic). Roll one die for each attempt:
- Man with axe: Okay, this one IS automatic. WHACK!
- Man with cutlass: Cuts line on a roll of 4, 5 or 6. Automatic, for a captain.
- Man with no blade: Unties line on a roll of 6.
Once ships are tied together, they may not separate until all lines are gone.
SHIP COMBAT
Ship combat uses cannon. Each cannon may fire once per turn if two crew are available to fire it. (A single crew can fire a cannon every other turn, skipping the first turn on which the cannon has only a single crewman.)
Combat is rolled in any order but is considered simultaneous.
Measuring Distance
Measure the closest distance between the hulls of the attacker and its target. This will be the distance used for all cannon and smallarms fire (in either direction) between those two ships for that turn. (Note that during boarding actions, each smallarms shot fired at a target on the same ship is figured individually. A desperate captain may also turn a turreted cannon to sweep his own decks when he's boarded.)
If you fire at a target on land or in the water, measure the actual distance.
Aiming
A cannon must be able to point at its chosen target. Crew may be moved up to 1" away to get them out of the way of a turning cannon. However, a cannon may not fire through parts of its own ship! Exception: it MAY fire through its own rigging, doing one rigging hit to its own ship.
A cannon in a ship's broadside only fires straight ahead. However, if one cannon in a broadside can point at the target, they all can hit it.
A cannon on a rotating turret can hit anything that it can point at, except where blocked by its own ship.
Crossing the "T"
If a gun points down the length of its target ship, it is "crossing the T." This is a very desirable (and sometimes battle-winning) maneuver . . . shot flying the length of a ship is more likely to hit something!
When you cross a foe's T, all shots which hit deck or rigging get TWO "damage" rolls, and both rolls count.
There is no bonus for hull shots when crossing the T. In fact, if you are crossing from the front, all hull shots are at -2 to hit (the target is small, and the shape of the bow deflects them).
Choice of Targets
Choose one of three targets on the ship you are shooting at, before rolling to hit:
- Hull (an easy shot, and usually gives hull hits which can sink the target)
- Rigging (gives rigging hits, which slow the target's movement)
- Deck (usually gives crew hits, which can eventually leave the target unable to perform, or weaken it for boarding). If you fire at the deck, you may specify normal shot or grapeshot.
Reality Check on Target Choice
Realistically, a small ship can't fire at the decks of a much larger one, and a large ship can't depress its guns enough to hit a small one close-in. So far, we have chosen to ignore this.
Roll to Hit
Roll 3 dice to hit. A cannon hits on a roll of 10 or MORE. Adjust your roll as follows:
- +1 if the target is within 6 inches.
- 0 if it's at least 6 inches, but less than 2 feet.
- -1 if the target is 2 full feet away.
- -1 for every full 6 inches past 2 feet.
- -6 if you are firing grapeshot.
- +2 if the firing cannon is on land.
- +1 if the target is on land.
- +1 if the target is Hull, unless
- (a) you're firing at a boat: no bonus and a -3 penalty because it's a boat.
- (b) you are crossing his T: no bonus, but a -2 penalty.
- +1 if the gun is being laid by British redcoats or bluecoats.
- +1 if a Pirate Captain or expert gunner is laying the gun.
- +1 for a target of Class 6 or above, or for a large building (GM rules)
- -1 for a target of Class 1
- -3 for a target of Class 0 (that is, a boat), and there is no bonus for a Hull shot.
A roll of triple 1's means your cannon has burst. Remove it, and its crew. Yes, this can kill your captain.
A roll of triple 6's means you have disabled the wheel or rudder of your target, no matter what you were firing at; no further roll to hit is needed. See "Steering Damage."
If you hit, roll 3 dice on the appropriate table.
HULL
3-9 - Target takes one hit of Hull Damage.
10-13 - Target takes two hits of Hull Damage.
14-15 - Target takes THREE hits of Hull Damage.
16 - A gun is hit! Remove one gun. Roll again if target has no guns.
17-18 - As above, and roll one die. Even: lose 1 crew. Odd: lose 2 crew.
RIGGING
- 3-8 - Shot passes harmlessly through the rigging.
- 9-12 - Target takes one hit of Rigging Damage.
- 13-16 - Target takes TWO hits of Rigging Damage.
- 17-18 - A mast comes down! Single-masted ships lose ALL remaining rigging hits. Ships with two masts lose half their original rigging hits. Ships with 3 or more masts lose 1/3 their original rigging hits. Round off in the target's favor. (Bowsprits aren't masts.)
DECK (firing normal shot)
- 3-6 -Target takes a point of Hull Damage.
- 7-9 - Target loses 2 crewmen.
- 10-11 - Target loses 1 crewman.
- 12 - Lines are cut! Target takes a hit of Rigging Damage.
- 13-14 - A gun is hit! Remove one gun. Roll again if target has no guns.
- 15-16 - As above, and roll one die. Even: lose 1 crew. Odd: lose 2 crew.
- 17-18 - A mast comes down! Results are as for RIGGING, above.
DECK (firing grapeshot)
(remember the extra -6 to hit if you fire grape!)
Modify your roll by +1 for every 5 crew aboard your target at the moment you make this roll.
- 3-10 - Target loses 1 crewman. But if the target is down to 1 or 2 crew, this result becomes a miss!
- 11-15 - Target loses 2 crew. If he has only 2 left, he loses one.
- 16 or more - Target loses 3 crew! If he has 3 or fewer, he loses one.
DECK (firing heated shot)
Heated shot can only be fired from shore batteries. See Fire and Fire Damage, below.
Roll at -2 to hit . . . if you hit, roll as for normal shot AND roll one die for fire. On a 5 or 6, the ship catches fire. Place a fire marker. Damage Control will remove a fire marker. After the Damage Control phase every turn, double the number of fire markers remaining, and evaluate their results, which may include hull damage or rigging damage. Fire can destroy a ship!
EFFECTS OF DAMAGE
Hull Damage
When a ship is down to 20% of its hull hits, it begins to take on water, which has the effect of adding more hull hits! Roll a die at the beginning of every turn that a ship is at or below the 20% level (shown on record sheet). On a 1, 2 or 3, one more hull hit is taken.
When a ship loses all its hull hits, it sinks. Any man still on board is carried down unless he rolls a 6 on one die, in which case he is swimming. Prudent sailors may abandon ship earlier.
A sunk ship yields a small number of bits of wreckage which can support a swimmer and keep him safe from sharks. The GM determines this, perhaps by seeing how many convenient bits he can pull off.
Lifeboats: If the ship has boats, up to 7 men may escape in each boat. No die roll is needed to make it to the boat. In a roleplaying scenario, a captain may buy boats but the player need not actually store them on board his ship (they're fairly clunky). Just record them, and use them when you need them.
Rigging Damage
The effect of rigging hits depend on ship class, as follows:
- (1) Rigging damage is ignored until accumulated rigging hits exceed the ship's class. A cutter ignores its first hit. A Class 5 ignores its first 5, and so on.
- (2) After that, every (Class) rigging hits reduce her movement by 1". So a Class 3, for instance, loses 1" of movement on her 6th rigging hit, another 1" on her 9th, and so on.
- (3) A ship who has lost all her rigging hits goes to 0 movement.
This means that cutters (with only 5 rigging hits) will go from a movement of 8 (on their 4th hit) to 0 (on their 5th and last, as the mainmast falls). On the other hand, a big ship will lose its speed more slowly.
If a ship has taken its maximum number of rigging hits, it can no longer move (except as her hull is blown by the wind) or steer! Once this happens, it now takes TWO damage control rolls to repair one hit of rigging damage (they are erecting jury masts and so on). (More effort, and a trip to port, is required for roleplaying campaigns - a complete fix is possible, but not in combat.)
Crew Losses
Dead crew are dead. They automatically fall overboard, where the sharks will soon deal with them. The ship's owner chooses which of his crew to lose. Captains and other special figures are never hit unless all other crew are gone.
Gun Losses
The owner of a ship chooses which of his guns to lose. They may be pulled from the ship or sometimes preferable marked with white cotton to indicate that they have been smashed.
Steering Damage
If a ship takes damage to her wheel or rudder, her crew cannot control her direction. This requires 12 Damage Control actions, and a minimum of 3 turns, to fix. In the meantime, the target's course changes automatically by one point every turn, toward the wind. Her speed is half the maximum she would normally make at that heading. The crew can reduce her speed below that!
Fire and Fire Damage
Ships may catch fire due to heated shot (q.v.), or by deliberate action of their crews. It takes one crew action to place a fire marker. It takes one successful Damage Control to remove one.
After the Damage Control phase every turn, place a new fire marker beside each remaining one (or as close as possible). Then evaluate their results, as follows:
- Each 5 fire markers: one Rigging hit.
- Each 10 fire markers: one Hull hit, and see below for chance of explosion.
Explosion
A ship which is on fire may explode if it has at least one barrel of gunpowder in its cargo, or if it is armed (all ships with cannon also have gunpowder aboard). On any turn that a ship takes Hull hits from fire, roll one die. If the result is equal to or less than the number of Hull hits it took that turn, the ship explodes. It sinks immediately; all crew aboard are lost.
Furthermore, nearby ships may be damaged. For each nearby ship, roll two dice, subtract the distance between the ships, and ADD the Class of the ship that exploded:
- 0 to 5: That many rigging hits.
- 6 to 10: That many rigging hits, and 2 hull hits.
- 11 to 15: 10 rigging hits, 4 hull hits, -2 crew.
- 16 and up: 10 rigging hits, 6 hull hits, -4 crew.
CREW
Decorate one figure to indicate it clearly as your Captain (see above). Captains are hard to kill, and get bonuses in combat. Arrrr!
Specifically: A Captain is never killed by cannon or musket fire unless his whole crew is gone. He may be killed by a hand weapon, or by explosion of the cannon he is serving. If he falls overboard, no sea creature will molest him except the Great White Shark.
Number of Crew
A ship can carry as many crew as can be fit on board, but woe to those who fall off. A figure which is knocked off by its own player is considered to have fallen overboard! See SHARKS, below.
It does not matter for game purposes WHERE each figure is located on board ship, except during boarding actions. At that point, weapon ranges are measured individually (use the distance between the figures' heads), and hand weapons may be used only if the hand weapon, in the outstretched arm of the figure, can actually touch its target.
Crew Actions
Each crewman can take one ACTION per turn. Players may need to use scratch paper to note how many crew have acted, if the crew is large. Possible actions include:
- Manage the ship. This requires as many men as the ship's class. If the ship does not have enough men to manage it, it loses 2" of movement for each missing man!
- Trim sail. Extra actions can be used to change the ship's course in mid-turn; see above under Movement.
- Drop or weigh anchor. See "Stopping," above.
- Fire cannon. Two men can fire a cannon every turn. One man can fire a cannon every other turn.
- Damage control. Crew told off for damage control are divided into parties. Each party may have from 1 to 6 men. Each party can attempt to fix one hull, rigging or steering hit. Roll 1 die for each party. If the result is equal to or less than the number of men in the party, one hit is repaired. (This is the only time in the game when you want to roll LOW.) (Putting out fires is a special case: each man in the party rolls one die, and on a 4, 5 or 6, one fire marker is removed.)
- Exchange Weapons. Any figure can trade weapons with any other figure on the ship, or switch out his weapon for another one in a barrel (or whatever).
- Smallarms fire. A figure who has a gun can use it.
- Boarding combat. A figure who does not do anything else can move along the decks of his own ship . . . or an enemy, if he can board it . . . and fight the foe.
Crew Movement
Figures can move 6" per turn along ship decks (3" with a peg leg, except for peg-legged captains, who are as sprightly as ever despite their timber toes). They can climb masts and rigging at the same speed.
For game purposes, moving from one ship to another costs no extra movement if they are touching. If they are not touching, sailors may attempt to jump up to 1" of distance. They make it on a 4, 5 or 6; if they fail, they fall in the water. See "Swimming" and "Sharks," below.
Swimming: A crewman who falls in the water drops any weapons he is holding; they sink and are lost. (Exceptions: Islanders don't drop things, and oars don't sink.)
Smallarms Fire
Muskets and pistols are fired like cannon: you must have a line of sight to the target, and roll 3 dice to hit. The only fruitful target is an enemy figure, or possibly a shark or other creature. Smallarms fire is rolled in any order but is considered simultaneous.
A musket or pistol hits on a roll of 11 or MORE. Adjust your roll as follows:
- -1 for every full 3 inches to the target, for a musket.
- -1 for every full INCH to the target, for a pistol.
- -2 if the target is partially behind cover (a railing, for instance)
- +1 if the attacker is a Pirate Captain, expert marksman, redcoat or bluecoat.
A figure may hold one musket, or two pistols (a figure with a hook can't hold a pistol with the hook). A figure with two pistols can fire them both.
Results of Smallarms Fire
Pirate Captains cannot be hit by smallarms fire unless none of their crew is left, or unless an enemy Captain within 3 inches fires the shot.
Other crew are removed if hit, and fall to the sharks. (Wounding rules may be added later, but probably not.)
Rapid Figuring of Smallarms Fire
If a lot of muskets and pistols are being fired from one ship to another, rolling each one individually takes a lot of time. You may, if you choose, use the following table instead:
- To-hit roll of 18: remove one man for every 216 muskets fired
- To-hit roll of 17: one for every 54
- To-hit roll of 16: one for every 22
- To-hit roll of 15: one for every 11
- To-hit roll of 14: one for every 6
- To-hit roll of 13: one for every 4
- To-hit roll of 12: two for every 5
- To-hit roll of 11: one for every 2
- To-hit roll of 10: two for every 3
Hand Weapons
Sailors may also use cutlasses, boarding pikes, and other weapons. A figure can carry a cutlass in one hand and a pistol in the other, and use each of them once per turn . . . but using a cutlass in each hand is not allowed. Larger hand weapons (axes and so on) require two hands. Each weapon strikes only once per turn.
A hook is considered a cutlass for all purposes except that if a pirate has a hook and a cutlass, he can strike with both on the same turn. And swimming pirates never drop their hooks!
Any weapon is within range if it can touch its target when the figure extends its arm. To hit with a hand weapon, roll 3 dice. Hand weapon combat is rolled in any order but is considered simultaneous.
A hand weapon hits on a roll of 9 or MORE. Adjust your roll as follows:
- -2 if the target is partially behind cover (a railing, for instance) - unless you are attacking with a spear or pike.
- -2 if the target has a sword of some kind, to parry with. (This is allowed even if the target has already taken some other action if a pirate is serving his ship's cannon but carrying a cutlass, he can parry with it.) A pirate with a hook and a sword, or two swords, cannot get a double bonus.
- -1 if the target has any other weapon to parry with. But if a smallarm is used to parry a sword cut, it becomes worthless; discard it. (Again, he can parry even if he has already taken another action..)
- +2 if the attacker is a Pirate Captain or expert swordsman; +4 if he's both!
- -2 if the target is a Pirate Captain or expert swordsman; -4 if he's both.
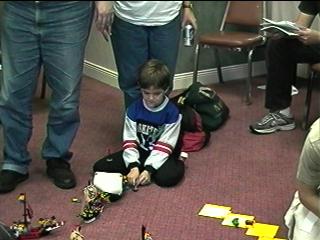
THE SHARKS
There are sharks, and other creatures, in the water. They are hungry. They are controlled by a referee, or by a volunteer who likes playing the sharks. (This is a suitable role for a very young player . . . see the picture!)
 When battle is joined, the referee will place a few sharks nearby in whatever way suits his fancy.
Thereafter, sharks move 6" per turn. They move toward the closest dead figure in the water, no matter how far away it is . . . except that if there is a LIVE man in the water within 1 foot, and no dead figures are closer, they'll go for the live one.
If a shark catches a man in the water, it's goodbye (unless he has a peg leg -- see below). A shark can eat half a figure per turn. Victims are removed, half a figure at a time, and replaced in the referee's box. Sharks don't get full; when a figure is completely eaten, the nearby sharks head for the next target.
A figure in the water can swim 2" per turn (4" for Islanders). If he reaches the side of a ship, he may scramble up. If it is a hostile ship, of course, he may be shot. (But ordinary pirates rescued from shark-infested waters by other pirates will usually join their rescuers, regardless of previous loyalties.)
A figure on floating wreckage is safe from ordinary sharks, but perhaps not from certain other denizens of the deep.
A figure with a peg leg is safe against sharks, for a little while. On the first bite, each shark will get a mouthful of wood, and back off. If the pirate is swimming for safety, he will escape. (But peg-legged pirates who disport themselves in the water, laughing at their unlucky brethren, will get a nasty surprise, at the GM's whim.)
No sea creature will harm a living Captain except for the Great White Shark, which will eat him up just as an ordinary shark eats ordinary seamen. Of course, the Great White Shark eats everything else, too.
Other Sea Creatures
Dolphins are friendly. No seaman will harm a dolphin. Dolphins move after other sea creatures. Dolphins dislike sharks and sawfish, and will attack them at the end of their movement; a dolphin has a 50% chance of toasting a shark in each attack, and the shark has only a 1 in 6 chance of a successful return attack. Dolphins move 8" a turn.
Sawfish have a bad attitude. Not only do they attack swimmers like sharks, but their attack has a 1 in 6 chance of sinking rowboats and other floating wreckage. They move like sharks.
Octopi move only 3" a turn, but they can reach onto wreckage, or even into a rowboat, to GRAB sailors. A grab has a 50% chance of being successful, and a successful grab has a 50% chance of pulling the victim into the water. (If the victim is not pulled into the water, the pirates have a chance to kill the octopus, or to sever the offending arm with a cutlass or other blade; any hit will sever it.) An octopus who gets someone in the water will dive deep, and the victim will not be seen again.
Manta rays move 6" a turn, but can fly through the air for up to 12" (two turns) after moving 12" in the water. They cannot kill sailors in the water, but they like to pick up the scraps when the sharks are through. If they aim at someone while airborne, they have a 50% chance of hitting. Anyone hit by a flying manta ray will fall in the water.
Sea monsters exist. All pirates are sure of this. No pirates agree on their nature.
Combat Against Sharks and Other Creatures
Cannons and pistols are no use against sharks. A musket shot which hits a shark has a 1 in 6 chance of the shark noticing it. If the shark notices, there is a 1 in 6 chance that it will go into death agonies which will draw ALL sharks, and perhaps other creatures, for several turns. Otherwise, the shark will just remember urgent business elsewhere.
Occupants of boats or floating wreckage may use their cutlasses and other hand weapons to discourage sharks. Treat as above.
Other sea creatures are affected in the same way sharks are, except for sea monsters. Who knows what will kill a sea monster?
Land Creatures
Alligators and crocodiles are played just like sharks, except that they move 4" a turn on land OR in water. They are usually found on land, but happily pursue victims into the ocean. Sharks and gators don't bother each other unless one is wounded, in which case it becomes fair game.
Snakes may be attacked with any weapon, but at a -3 to hit. They move 4" on land, 2" in water. A snake which reaches a victim will strike with a 50% chance of hitting; its bite is instant death. Peg-legged pirates have a 50% chance of being bitten in their wooden leg, though, which saves them.
Scorpions may be attacked with any weapon, but at a -2 to hit. They move 4" on land. A scorpion which reaches a victim will sting with a 50% chance of hitting (wooden legs give a further 50% chance of escaping harm, as above). A victim who is stung will be paralyzed and can do nothing until taken aboard ship; a day at sea will cure him. (One man can assist a paralyzed comrade, moving at half speed.)
Spiders are treated like scorpions, except (1) they move instantly from any part of their web to any other part, and 2" otherwise; (2) they can also drop out of trees to bite their victims, and (3) they are automatically successful when they bite, and know better than to bite wooden legs.
GM-ING NON-PIRATE CHARACTERS
NPCs will be more commonly found in the campaign game (see below). But even in a purely fighting game, the referees may occasionally need to determine how ships and men THEY control, or pirates who are far away from their captain, will behave.
The first way, good for Royal Navy ships and the like, is "Decide arbitrarily in advance and stick to it." You might decide in advance, for instance, that all Royal Navy ships will fight to the last man, or that the whole crew of the Lady Nancy will happily turn pirate if given the chance. That works.
The second way is to make a random "reaction roll." In this game, there's no need to be complex. Just roll one die. The higher the result, the more favorable to the pirate. On a 1, merchant ships will turn and fight; on a 3 or 4 they would flee; on a 6, they surrender instantly. In a strange port, liberty for the crew might be unsatisfying and overpriced on a 1 but wild and cheap on a 6, and so on.
In a game where pirate captains have Reputation, you should ADD their reputation to any roll when it's appropriate . . . that is, when the NPCs in question know who they're dealing with. This will give results higher than 6 . . . which are VERY favorable.
Continue to Parte ye Second: the Campaign Game